使用JAX-RS 2.0创建REST API
在REST API设计教程中,我们学会了将REST原则放在网络应用程序的设计过程中。在本文中,我们将学习使用JAX-RS 2.0(用于RESTful服务的Java API)创建REST API 。
目录
JAX-RS 2.0规范
JAX-RS 2.0批注
创建Maven应用程序
包括JAX-RS依赖关系到应用程序
创建资源表示
在运行时创建REST资源
寄存器资源
演示
googletag.cmd.push(function() { googletag.display('waldo-tag-4084'); });
JAX-RS 2.0规范
JAX-RS提供了可移植的API,用于开发,公开和访问符合REST架构风格原则设计和实现的Web应用程序。
Java EE 6版本通过引入用于RESTful Web服务的Java API(JAX-RS) [ JSR 311 ],迈出了标准化RESTful Web服务API的第一步。JAX-RS确保跨所有符合Java EE的应用程序服务器的REST API代码的可移植性。最新版本是JAX-RS 2.0 [ JSR 339 ],它是作为Java EE 7平台的一部分发布的。
JAX-RS专注于将Java注释应用于普通Java对象。JAX-RS具有将特定URI模式和HTTP操作绑定到Java类的各个方法的注释。它还有注释,可以帮助您处理输入/输出参数。
正如我们已经说过JAX-RS是规范; 这意味着我们需要让它的实现来运行REST API代码。目前可用的一些流行的JAX-RS实现是:
JAX-RS 2.0 Annotations
让我们来看看JAX-RS 2.0提供的一些重要注释。
@Path( 'resourcePath')
它用于匹配相对于基URI的URI路径。它可以在资源类或方法上指定。
@Path("/configurations")
public class ConfigurationResource
{
    @Path("/{id}")
    @GET
    public Response getConfigurationById(@PathParam("id") Integer id){
        ...
    }
}设置路径base URL + /resourcePath。基本URL基于应用程序名称,servlet和web.xml配置文件中的URL模式。
@POST
带注释的方法将处理HTTP POST匹配资源路径上的请求。
@POST
@Consumes("application/xml")
public Response createConfiguration(Configuration config) {
    ...
}
@PUT
带注释的方法将处理HTTP PUT匹配资源路径上的请求。
@PUT
@Consumes("application/xml")
public Response updateConfiguration(@PathParam("id") Integer id, Configuration config){
    ...
}
@GET
带注释的方法将处理HTTP GET匹配资源路径上的请求。
@GET
@Path("/{id}")
public Response getConfigurationById(@PathParam("id") Integer id){
    ...
}
@DELETE
带注释的方法将处理HTTP DELETE匹配资源路径上的请求。
@DELETE
@Path("/{id}")
public Response deleteConfiguration(@PathParam("id") Integer id){
    ...
}
@PathParam(“parameterName”)
它用于将URL中的值(资源标识符)注入方法参数。
@DELETE
@Path("/{id}")
public Response deleteConfiguration(@PathParam("id") Integer id){
    ...
}在上面的例子中,idfrom 的值/{id}将匹配@PathParam("id") Integer id。例如,URI HTTP DELETE /configurations/22312将映射到上面的方法,id并将使用值填充22312。
@Produces
它定义了带注释的资源方法传递的MIME类型。它可以在类级别和方法级别定义。如果在类级别定义,则资源类内的所有方法都将返回相同的MIME类型,如果不在任何方法中重写。
@Path("/configurations")
@Produces("application/xml")
public class ConfigurationResource {
    ...
}
@Consumes
它定义了带注释的资源方法使用的MIME类型。
@POST
@Consumes("application/xml")
public Response createConfiguration(Configuration config) {
    ...
}
@Context
为了构建HATEOAS链接,JAX-RS 2.0提供了UriInfo可以使用@Context注释获得的类。
@Context
UriInfo uriInfo;
默认情况下,如果未明确实现,JAX-RS运行时将自动支持HEAD和OPTIONS方法。对于HEAD,运行时将调用实现的GET方法(如果存在)并忽略响应实体(如果设置)。OPTIONS方法可以在“允许”标题中返回带有一组受支持的资源方法的响应。
创建Maven应用程序
Maven是一个软件项目管理和理解工具,包括项目构建,报告和来自中心信息的文档,即pom.xml。
要在eclipse中使用maven创建应用程序,请按照下列步骤操作:
-
从File> New> Maven Project打开新项目向导
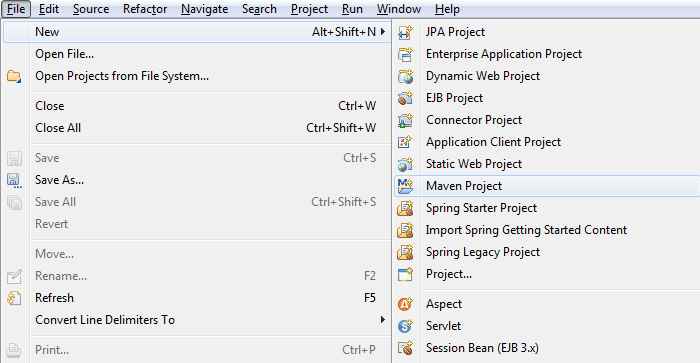
创建Maven应用程序 - 步骤1
-
单击“下一步”
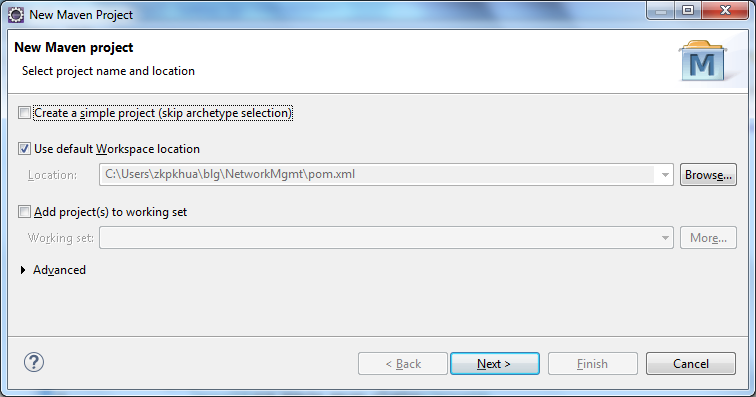
创建Maven应用程序 - 步骤2
-
选择maven-archtype-webapp
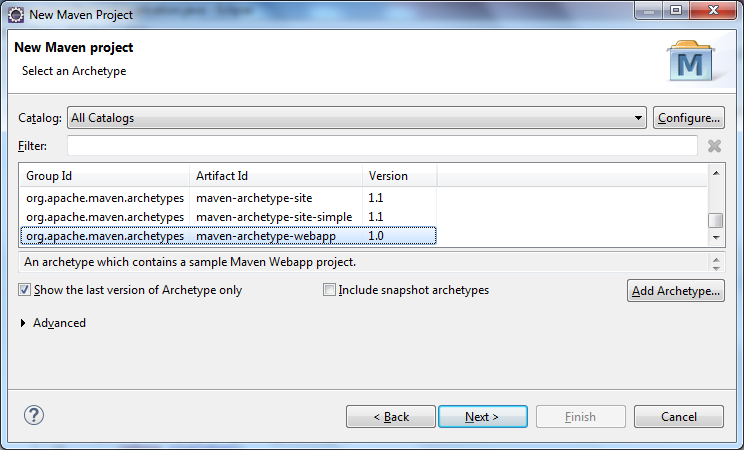
创建Maven应用程序 - 步骤3
-
填写项目详细信息,然后单击“完成”
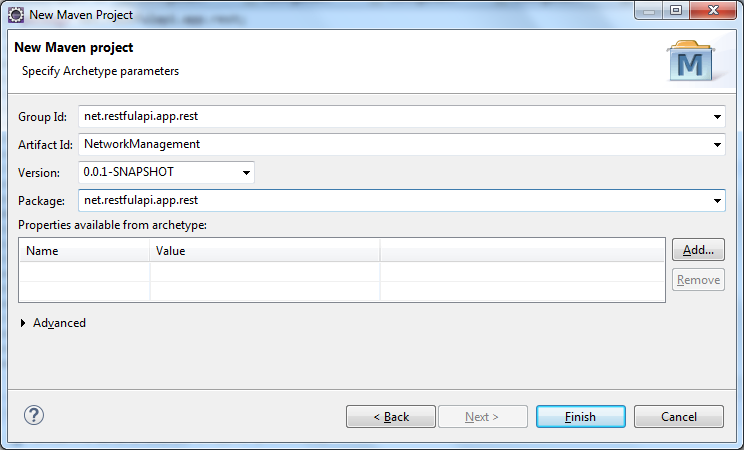
创建Maven应用程序 - 步骤4
包括应用程序的JAX-RS依赖项
JAX-RS 2.0与JDK 1.7捆绑在一起,因此如果你有JDK 1.7或更高版本,[JAVA_HOME](https://docs.oracle.com/cd/E19182-01/820-7851/inst_cli_jdk_javahome_t/)则不需要单独包含JAX-RS。但是,您需要包含上面列出的其中一个实现。
在这个例子中,我使用的是RESTEasy 3.1.2.Final。
<project xmlns="http://maven.apache.org/POM/4.0.0" xmlns:xsi="http://www.w3.org/2001/XMLSchema-instance"
    xsi:schemaLocation="http://maven.apache.org/POM/4.0.0 http://maven.apache.org/maven-v4_0_0.xsd">
    <modelVersion>4.0.0</modelVersion>
    <groupId>net.restfulapi.app</groupId>
    <artifactId>NetworkManagement</artifactId>
    <packaging>war</packaging>
    <version>0.0.1-SNAPSHOT</version>
    <name>NetworkManagement</name>
    <url>http://maven.apache.org</url>
    <repositories>
        <repository>
            <id>jboss</id>
            <name>jboss repo</name>
            <url>http://repository.jboss.org/nexus/content/groups/public/</url>
        </repository>
    </repositories>
    <build>
        <plugins>
            <plugin>
                <groupId>org.apache.maven.plugins</groupId>
                <artifactId>maven-compiler-plugin</artifactId>
                <version>3.2</version>
                <configuration>
                    <source>1.8</source>
                    <target>1.8</target>
                </configuration>
            </plugin>
        </plugins>
        <finalName>NetworkManagement</finalName>
    </build>
    <dependencies>
        <dependency>
            <groupId>org.jboss.resteasy</groupId>
            <artifactId>resteasy-jaxrs</artifactId>
            <version>3.1.2.Final</version>
        </dependency>
        <dependency>
            <groupId>org.jboss.resteasy</groupId>
            <artifactId>resteasy-jaxb-provider</artifactId>
            <version>3.1.2.Final</version>
        </dependency>
        <dependency>
            <groupId>org.jboss.resteasy</groupId>
            <artifactId>resteasy-servlet-initializer</artifactId>
            <version>3.1.2.Final</version>
        </dependency>

        <dependency>
            <groupId>junit</groupId>
            <artifactId>junit</artifactId>
            <version>3.8.1</version>
            <scope>test</scope>
        </dependency>
    </dependencies>
</project>
resteasy-servlet-initializer artifact可以自动扫描Servlet 3.0容器中的资源和提供程序。
创建资源表示
在JAX-RS,资源表示是带有加注解的POJO类JAXB注解,即@XmlRootElement,@XmlAttribute和@XmlElement等。
在这个例子中,我们暴露了两个表示。让我们为它们创建java类。
1)配置集合资源
package net.restfulapi.app.rest.domain;

import java.util.List;

import javax.ws.rs.core.Link;
import javax.xml.bind.annotation.XmlAccessType;
import javax.xml.bind.annotation.XmlAccessorType;
import javax.xml.bind.annotation.XmlAttribute;
import javax.xml.bind.annotation.XmlElement;
import javax.xml.bind.annotation.XmlRootElement;
import javax.xml.bind.annotation.adapters.XmlJavaTypeAdapter;

@XmlRootElement(name = "configurations")
@XmlAccessorType(XmlAccessType.FIELD)
public class Configurations
{
    @XmlAttribute
    private Integer size;

    @XmlJavaTypeAdapter(Link.JaxbAdapter.class)
    @XmlElement
    private Link link;

    @XmlElement
    private List<Configuration> configurations;

    public Integer getSize() {
        return size;
    }

    public void setSize(Integer size) {
        this.size = size;
    }

    public Link getLink() {
        return link;
    }

    public void setLink(Link link) {
        this.link = link;
    }

    public List<Configuration> getConfigurations() {
        return configurations;
    }

    public void setConfigurations(List<Configuration> configurations) {
        this.configurations = configurations;
    }
}
2)配置资源
package net.restfulapi.app.rest.domain;

import javax.ws.rs.core.Link;
import javax.xml.bind.annotation.XmlAccessType;
import javax.xml.bind.annotation.XmlAccessorType;
import javax.xml.bind.annotation.XmlAttribute;
import javax.xml.bind.annotation.XmlElement;
import javax.xml.bind.annotation.XmlRootElement;
import javax.xml.bind.annotation.adapters.XmlJavaTypeAdapter;

import net.restfulapi.app.rest.domain.common.Status;

@XmlRootElement(name="configuration")
@XmlAccessorType(XmlAccessType.FIELD)
public class Configuration
{
    @XmlAttribute
    private Integer id;
    @XmlJavaTypeAdapter(Link.JaxbAdapter.class)
    @XmlElement
    private Link link;
    @XmlElement
    private String content;
    @XmlElement
    private Status status;

    public Link getLink() {
        return link;
    }

    public void setLink(Link link) {
        this.link = link;
    }

    public Integer getId() {
        return id;
    }

    public void setId(Integer id) {
        this.id = id;
    }

    public String getContent() {
        return content;
    }

    public void setContent(String content) {
        this.content = content;
    }

    public Status getStatus() {
        return status;
    }

    public void setStatus(Status status) {
        this.status = status;
    }
}
3)消息资源[在没有资源表示时通知客户端]
package net.restfulapi.app.rest.domain.common;

import javax.xml.bind.annotation.XmlRootElement;

@XmlRootElement(name = "message")
public class Message {

    public Message() {
        super();
    }

    public Message(String content) {
        super();
        this.content = content;
    }

    private String content;

    public String getContent() {
        return content;
    }

    public void setContent(String content) {
        this.content = content;
    }
}此外,我们使用ConfigurationDB类模拟了数据库功能。它为配置资源集合和单个配置资源中的CRUD操作公开静态实用程序方法。
package net.restfulapi.app.dao;

import java.util.ArrayList;
import java.util.List;
import java.util.Map;
import java.util.concurrent.ConcurrentHashMap;
import java.util.concurrent.atomic.AtomicInteger;

import net.restfulapi.app.rest.domain.Configuration;
import net.restfulapi.app.rest.domain.common.Status;

public class ConfigurationDB {
    private static Map<Integer, Configuration> configurationDB = new ConcurrentHashMap<Integer, Configuration>();
    private static AtomicInteger idCounter = new AtomicInteger();

    public static Integer createConfiguration(String content, Status status){
        Configuration c = new Configuration();
        c.setId(idCounter.incrementAndGet());
        c.setContent(content);
        c.setStatus(status);
        configurationDB.put(c.getId(), c);

        return c.getId();
    }

    public static Configuration getConfiguration(Integer id){
        return configurationDB.get(id);
    }

    public static List<Configuration> getAllConfigurations(){
        return new ArrayList<Configuration>(configurationDB.values());
    }

    public static Configuration removeConfiguration(Integer id){
        return configurationDB.remove(id);
    }

    public static Configuration updateConfiguration(Integer id, Configuration c){
        return configurationDB.put(id, c);
    }
}
创建REST资源
我们已经在第二部分中了解了JAX-RS注释。让我们将它们应用于REST资源,并在REST资源上的操作上映射HTTP方法。
我在每个方法上面添加了自解释代码注释来解释它。
package net.restfulapi.app.rest.service;

import java.util.List;

import javax.ws.rs.Consumes;
import javax.ws.rs.DELETE;
import javax.ws.rs.GET;
import javax.ws.rs.POST;
import javax.ws.rs.PUT;
import javax.ws.rs.Path;
import javax.ws.rs.PathParam;
import javax.ws.rs.Produces;
import javax.ws.rs.core.Context;
import javax.ws.rs.core.Link;
import javax.ws.rs.core.Response;
import javax.ws.rs.core.UriBuilder;
import javax.ws.rs.core.UriInfo;

import net.restfulapi.app.dao.ConfigurationDB;
import net.restfulapi.app.rest.domain.Configuration;
import net.restfulapi.app.rest.domain.Configurations;
import net.restfulapi.app.rest.domain.common.Message;
import net.restfulapi.app.rest.domain.common.Status;

/**
 * This REST resource has common path "/configurations" and
 * represents configurations collection resource as well as individual collection resources.
 *
 * Default MIME type for this resource is "application/XML"
 * */
@Path("/configurations")
@Produces("application/xml")
public class ConfigurationResource
{
    /**
     * Use uriInfo to get current context path and to build HATEOAS links
     * */
    @Context
    UriInfo uriInfo;

    /**
     * Get configurations collection resource mapped at path "HTTP GET /configurations"
     * */
    @GET
    public Configurations getConfigurations() {

        List<Configuration> list = ConfigurationDB.getAllConfigurations();

        Configurations configurations = new Configurations();
        configurations.setConfigurations(list);
        configurations.setSize(list.size());

        //Set link for primary collection
        Link link = Link.fromUri(uriInfo.getPath()).rel("uri").build();
        configurations.setLink(link);

        //Set links in configuration items
        for(Configuration c: list){
            Link lnk = Link.fromUri(uriInfo.getPath() + "/" + c.getId()).rel("self").build();
            c.setLink(lnk);
        }
        return configurations;
    }

    /**
     * Get individual configuration resource mapped at path "HTTP GET /configurations/{id}"
     * */
    @GET
    @Path("/{id}")
    public Response getConfigurationById(@PathParam("id") Integer id){
        Configuration config = ConfigurationDB.getConfiguration(id);

        if(config == null) {
            return Response.status(javax.ws.rs.core.Response.Status.NOT_FOUND).build();
        }

        if(config != null){
            UriBuilder builder = UriBuilder.fromResource(ConfigurationResource.class)
                                            .path(ConfigurationResource.class, "getConfigurationById");
            Link link = Link.fromUri(builder.build(id)).rel("self").build();
            config.setLink(link);
        }

        return Response.status(javax.ws.rs.core.Response.Status.OK).entity(config).build();
    }

    /**
     * Create NEW configuration resource in configurations collection resource
     * */
    @POST
    @Consumes("application/xml")
    public Response createConfiguration(Configuration config){
        if(config.getContent() == null)  {
            return Response.status(javax.ws.rs.core.Response.Status.BAD_REQUEST)
                            .entity(new Message("Config content not found"))
                            .build();
        }

        Integer id = ConfigurationDB.createConfiguration(config.getContent(), config.getStatus());
        Link lnk = Link.fromUri(uriInfo.getPath() + "/" + id).rel("self").build();
        return Response.status(javax.ws.rs.core.Response.Status.CREATED).location(lnk.getUri()).build();
    }

    /**
     * Modify EXISTING configuration resource by it's "id" at path "/configurations/{id}"
     * */
    @PUT
    @Path("/{id}")
    @Consumes("application/xml")
    public Response updateConfiguration(@PathParam("id") Integer id, Configuration config){

        Configuration origConfig = ConfigurationDB.getConfiguration(id);
        if(origConfig == null) {
            return Response.status(javax.ws.rs.core.Response.Status.NOT_FOUND).build();
        }

        if(config.getContent() == null)  {
            return Response.status(javax.ws.rs.core.Response.Status.BAD_REQUEST)
                            .entity(new Message("Config content not found"))
                            .build();
        }

        ConfigurationDB.updateConfiguration(id, config);
        return Response.status(javax.ws.rs.core.Response.Status.OK).entity(new Message("Config Updated Successfully")).build();
    }

    /**
     * Delete configuration resource by it's "id" at path "/configurations/{id}"
     * */
    @DELETE
    @Path("/{id}")
    public Response deleteConfiguration(@PathParam("id") Integer id){

        Configuration origConfig = ConfigurationDB.getConfiguration(id);
        if(origConfig == null) {
            return Response.status(javax.ws.rs.core.Response.Status.NOT_FOUND).build();
        }

        ConfigurationDB.removeConfiguration(id);
        return Response.status(javax.ws.rs.core.Response.Status.OK).build();
    }

    /**
     * Initialize the application with these two default configurations
     * */
    static {
        ConfigurationDB.createConfiguration("Some Content", Status.ACTIVE);
        ConfigurationDB.createConfiguration("Some More Content", Status.INACTIVE);
    }
}
在运行时注册资源
要使用服务器的运行时注册JAX-RS REST资源,您需要扩展javax.ws.rs.core.Application类并将其放在应用程序的类路径中。
package net.restfulapi.app.rest;

import java.util.HashSet;
import java.util.Set;

import javax.ws.rs.ApplicationPath;
import javax.ws.rs.core.Application;

import net.restfulapi.app.rest.service.ConfigurationResource;

@ApplicationPath("/network-management")
public class NetworkApplication extends Application {

   private Set<Object> singletons = new HashSet<Object>();
   private Set<Class<?>> empty = new HashSet<Class<?>>();

   public NetworkApplication() {
      singletons.add(new ConfigurationResource());
   }

   @Override
   public Set<Class<?>> getClasses() {
      return empty;
   }

   @Override
   public Set<Object> getSingletons() {
      return singletons;
   }
}这里的@ApplicationPath注释将此类标识为servlet 3.0容器中自动扫描过程的REST应用程序。它有助于使web.xml文件几乎为空 - 根本没有特定于REST的配置。
<web-app version="3.0" xmlns="http://java.sun.com/xml/ns/javaee"
        xmlns:xsi="http://www.w3.org/2001/XMLSchema-instance"
        xsi:schemaLocation="http://java.sun.com/xml/ns/javaee http://java.sun.com/xml/ns/javaee/web-app_3_0.xsd">
    <display-name>Archetype Created Web Application</display-name>
</web-app>
演示
构建此项目并将其部署到任何Web服务器并启动服务器。现在通过在任何浏览器客户端上调用上面的URI来测试REST API。
HTTP GET http:// localhost:8080 / NetworkManagement / network-management / configurations
获取配置集合。
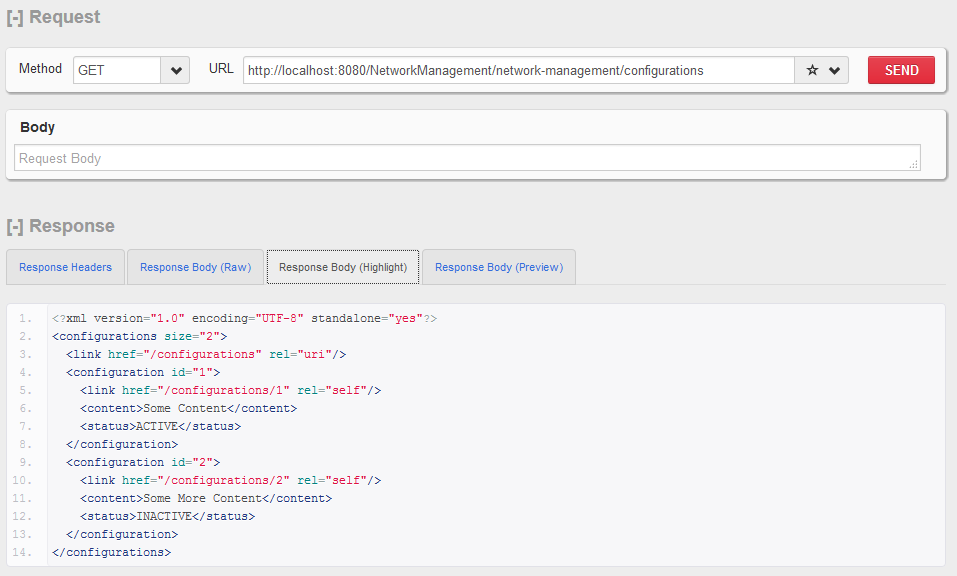
HTTP GET - 配置集合资源
HTTP GET http:// localhost:8080 / NetworkManagement / network-management / configurations / 1
获取单个配置。
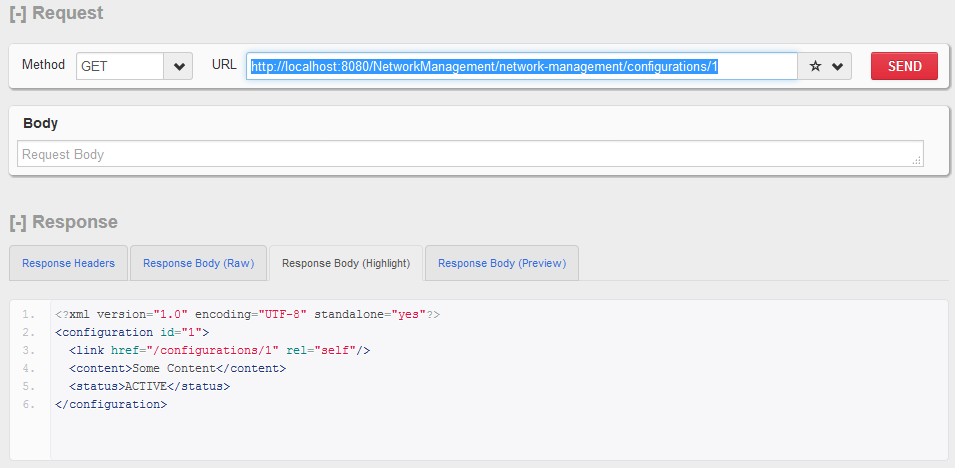
HTTP GET - 单个配置资源
HTTP POST http:// localhost:8080 / NetworkManagement / network-management / configurations
创建新的配置资源。
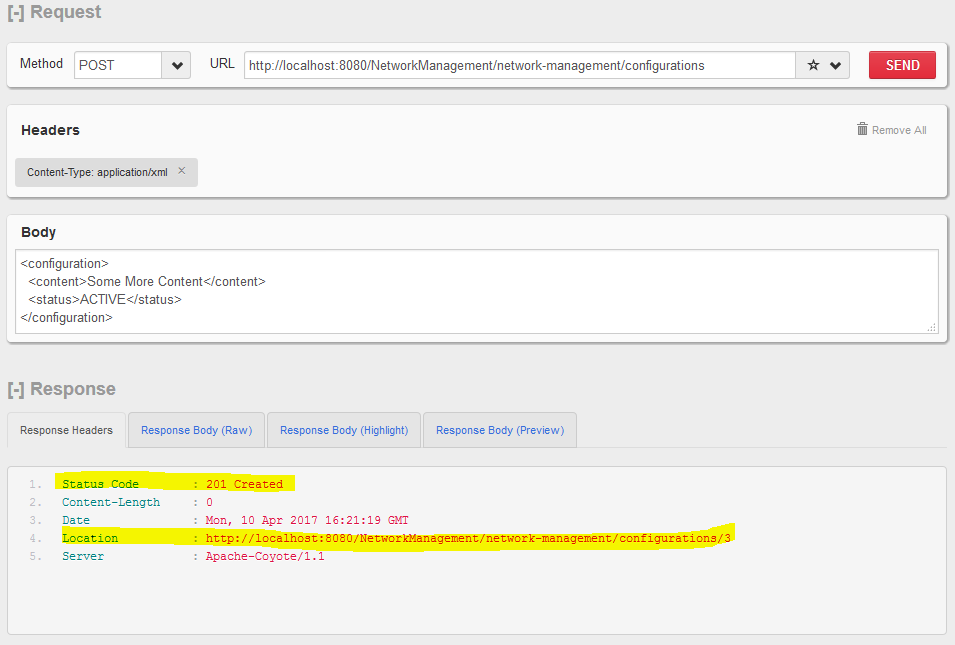
HTTP POST - 创建新资源
HTTP PUT http:// localhost:8080 / NetworkManagement / network-management / configurations / 1
更新配置资源。
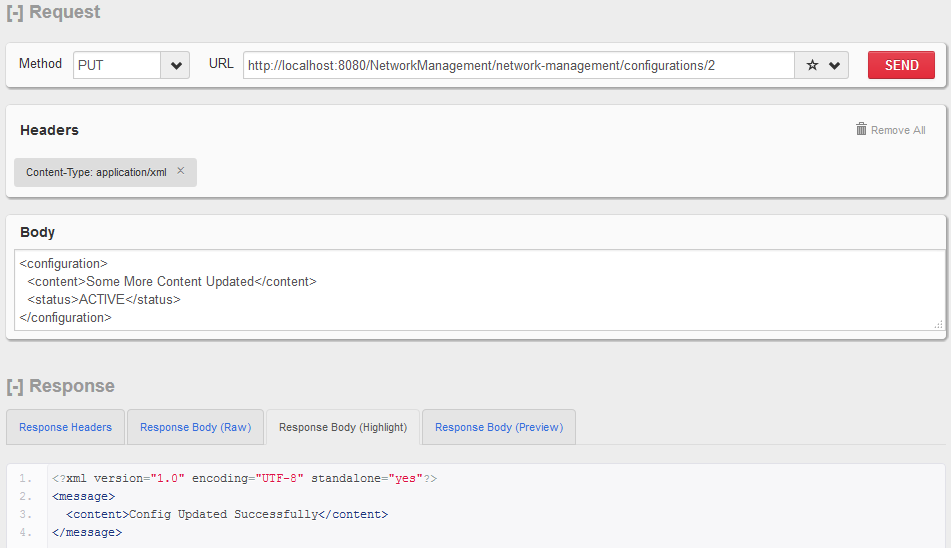
HTTP PUT - 更新单个配置资源
HTTP DELETE http:// localhost:8080 / NetworkManagement / network-management / configurations / 1
删除配置资源。
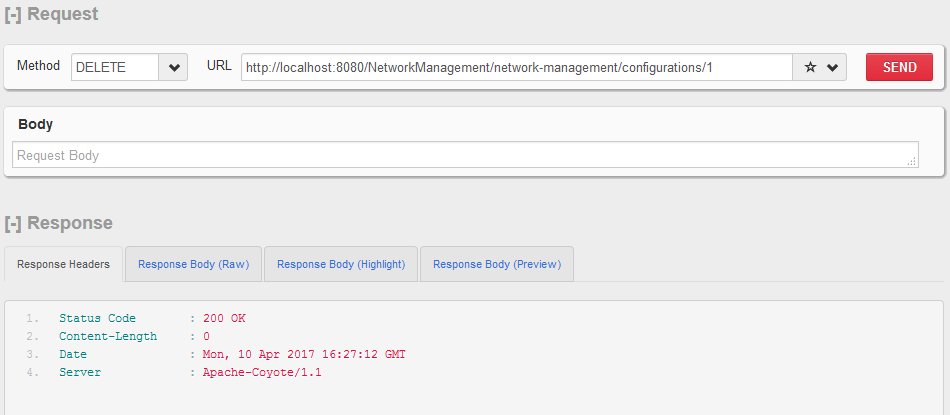
HTTP DELETE - 单个配置资源
单击给定的下载链接以下载此应用程序的源代码。